Sunday, April 29, 2012

Policy-Based Management with Central Management Servers


                As a database administrator, you may be in charge of multiple databases.  But often times, it’s the multi-server/instance burden that becomes the most “click” intensive.  What I mean by that is you have to connect to multiple servers and multiple instances, or in SSMS connect your Object Explorer to a bunch of different instances, and before you know it you have a spaghetti cluster of instances on your desktop.  You end up spending 90% of the time just mis-clicking the wrong one, or worse, executing T-SQL against an unintended instance.

                Sometimes, the above scenario is necessary.  But for much object/database/instance/server administration, this can be carried out with PBM (Policy-Based Management) with the combination of CMS (Central Management Servers).  This central location allows for the convenient method for do many tasks, and this blog post will focus on PBM with CMS.

                Policy-Based Management in and of itself is a great addition with SQL Server 2008.  But when you have dozens (or even hundreds) of instances that require a standard set of policies and conditions, manually pushing them out and evaluating them would be absurd (and let’s be honest…we should be automating at every possible junction).

                The first step to utilizing PBM with CMS is registering a Central Management Server:  Through SSMS in the Registered Servers section, right-click on Central Management Servers and select Register Central Management Server….  Select a SQL Server 2008 or higher instance to act as the CMS:


                To logically group your servers, I recommend creating a Server Group:  Right-click on the CMS and select New Server Group….  Name the Server Group to your desire.  I will be calling mine “2008R2” as this Server Group will house my 2008 R2 instances, and “2012” to contain my 2012 instances:


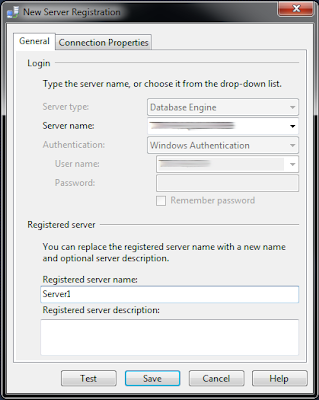
                Now I want to register a server in my 2008R2 Server Group:


                My Registered Servers pane should look like the below now.  Mind you, there are only a couple of instances here and this is a very over-simplified implementation of CMS:


                There are a couple of ways to approach PBM with CMS:  1) Create a Policy on the Central Management Server and use that to evaluate against managed servers, or 2) create a Policy and export/import to the managed servers.  I will be focusing on the former method.

                Go to the CMS and create a Policy.  Because this is not an in-depth look at the extreme flexibility and power of PBM, I will just use an MS-shipped out-of-the-box Best Practices Policy to import as an XML file.  In the Object Explorer of my CMS I will go into Management, Policy Management.  Right-click on Policies and select Import Policy….  Navigate to the desired Policy File (XML file format) and select it.  I chose the famous Database Auto Close Policy to work with:


                Now that I have a Policy created on my CMS, so I will not worry about duplicating this effort and exporting/importing into my registered servers.  Back at the Registered Servers SSMS pane, I want to be able to evaluate this Policy against all of the servers registered under my CMS named “CMS”.  I simply right-click on the CMS and select Evaluate Policies….  Now I will need to select the source.  In this case, my CMS will house all of the Policies, so I’ll choose this server.  


Select the Policy(ies) that you want to evaluate against the registered servers, and click Evaluate.  You should be staring at your evaluation results for the registered servers in the scope of where you selected to evaluate policies:
 

                And there it is!  We have just used the administrative power of Policy-Based Management, and ease of Central Management Servers to evaluate a Policy against a subset of registered servers.  If there are any comments, questions, or issues please feel free to leave a comment or email me at sqlsalt@gmail.com.

Wednesday, April 25, 2012

Data Corruption Part 2: Clustered Index Corruption


                In the last post (Part 1) I discussed how to approach a nonclustered index data corruption issue.  What I am going to be explaining here is what to do with data corruption of the clustered index.  I want to start out with a copy of my AdventureWorks2012 database:

restore database AdventureWorks2012_CorruptCI
from disk = 'C:\MyDir\adventureworks2012_base.bak'
with
       move 'adventureworks2012_data' to 'C:\MyDir\AW_Data_CorruptCI.mdf',
       move 'adventureworks2012_log' to 'C:\MyDir\AW_Log_CorruptCI.ldf',
       stats = 5
go

                Now I want to corrupt a clustered index.  Last week in Part 1 I went into a long explanation and demonstration how to corrupt data using a Hex Editor.  I’m not going to rehash, as the process is basically the same.  The only difference between last week’s nonclustered index and this week’s clustered index corruption is that I want to choose the clustered index of a table, and I have personally chose the Person.Person table (you’ll see why soon.  Hint:  constraints).

                So corrupt a clustered index, any clustered index.  Feel free to work along with me and corrupt the Person.Person clustered index.  Now set the database back online and run DBCC CHECKDB:

alter database AdventureWorks2012_CorruptCI
set online
go

dbcc checkdb('AdventureWorks2012_CorruptCI') with no_infomsgs
go

                Notice what you see.  Very much like last week’s result, we get a handful of errors.  Notice the summary of the DBCC command:

CHECKDB found 0 allocation errors and 4 consistency errors in table 'Person.Person' (object ID 1765581328).
CHECKDB found 0 allocation errors and 4 consistency errors in database 'AdventureWorks2012_CorruptCI'.
repair_allow_data_loss is the minimum repair level for the errors found by DBCC CHECKDB (AdventureWorks2012_CorruptCI).

                I have bolded the above portion because I believe it is worth discussing.  SQL Server actually plants the thought in the DBA’s head to use REPAIR_ALLOW_DATA_LOSS with DBCC CHECKDB as the “minimum”.  Now, one may be thinking “well this is the minimum, and SQL Server said it is okay then I think I’ll go right ahead.  It must be the right answer.”  Not always.  And we’ll see why now.  Let’s say you did run DBCC CHECKDB with REPAIR_ALLOW_DATA_LOSS:

alter database AdventureWorks2012_CorruptCI
set single_user
with rollback immediate
go

dbcc checkdb('AdventureWorks2012_CorruptCI', repair_allow_data_loss)
go

                Great!  It finishes, and all the issues were fixed.  So you grab your car keys, call your significant other, and tell them you’re on the way home.  Easy workday, no late dinner tonight!  Or so you thought.  Meanwhile, you’re grinning from ear to ear because you’ve fixed it… but there is something that was missed:  Something very important.  And then you receive the dreaded phone call.  Here’s what was missed.  Take for instance my Person.Person table that I corrupted.  Even after the REPAIR_ALLOW_DATA_LOSS normal queries like this are successful:

select *
from Person.Person

                So what could possibly be the problem?  Here’s what:  REPAIR_ALLOW_DATA_LOSS does just that… it may possibly delete data in order to fix the corruption.  But there is still yet another looming issue here.  The answer is in this next DBCC statement:

use AdventureWorks2012_CorruptCI
go

dbcc checkconstraints
go

                On my end that returned a whopping 25 foreign key relationships that were flagged as culprits:


                What looks like happened is that during my DBCC CHECKDB with the option to REPAIR_ALLOW_DATA_LOSS, SQL Server deleted five rows of data.  Well, because there were foreign key constraints referencing Person.Person, that has now become a pretty big problem (not to mention the underlying fact that we have just deleted data).

                The solution?  There is a good chance that when the root data, in this case the clustered index, is corrupt you will need to utilize a non-corrupt backup that you can restore side-by-side with the corrupt database and copy data over.  This is yet another reason why a great disaster recovery plan is necessary.  Things happen, data gets corrupted.  And there’s not always a quick and easy command, statement, or query to get it back to normal.  Do the appropriate investigation as to what exactly is corrupt, and the best means to fix it.

                The code for this test can be found on my GitHub SQLSalt repository.  A direct link to this test code is here.  NOTE:  THIS CODE AND TEST IS MEANT FOR ISOLATED TEST ENVIRONMENTS ONLY.  DO NOT RUN ANYWHERE NEART PRODUCTION.  If there are any comments, questions, or issues please feel free to leave a comment or email me at sqlsalt@gmail.com.

Sunday, April 15, 2012

Data Corruption Part 1: Nonclustered Index Corruption

                In this mini-blog-series I will be going over the different victims of data corruption:  Mainly nonclustered indexes (this post), clustered indexes, and system tables.  The first part of this blog post is how to corrupt a nonclustered index in a TEST environment in order to learn and practice the resolution to such a problem.  The base database I’ll be using is AdventureWorks2012 (it can be found here).  I then restored a copy of AdventureWorks2012 to corrupt, and called it AdventureWorks2012_CorruptNCI:

restore database AdventureWorks2012_CorruptNCI
from disk = 'C:\DatabaseFiles\AdventureWorks\AdventureWorks2012_base.bak'
with
       move 'AdventureWorks2012_Data'
              to 'c:\MyDataDir\AdventureWorks2012_CorruptCI_Data.mdf',
       move 'AdventureWorks2012_Log'
              to 'c:\MyLogDir\AdventureWorks2012_CorruptCI_log.ldf',
       stats = 5
go


Corrupting the Data
                First off, I want to emphasize that we are corrupting data!  In other words, THIS NEEDS TO BE DONE IN AN ISOLATED TEST ENVIRONMENT WITH TEST DATA AND DATABASES.  What we want to do now is corrupt a nonclustered index in our new AdventureWorks2012_CorruptNCI database.  I randomly chose the Person.EmailAddress table, so I wanted to get all of the indexes on that table:

select
       t.name as table_name,
       i.name as index_name,
       i.index_id,
       i.type_desc
from sys.indexes i
inner join sys.tables t
on i.object_id = t.object_id
where t.name = 'EmailAddress'
order by i.index_id

                After viewing the result set, I see there is nonclustered index on this table called IX_EmailAddress_EmailAddress (note the index_id of 2):  That will be our victim.  Now we want to see all of the page information of this index.  In order to do this, we’ll utilize the DBCC IND command to output a record per index page showing us certain page metadata:

dbcc ind('adventureworks2012_corruptnci', 'person.emailaddress', 2)
go

                This shows us a list of all pages in the nonclustered index, IX_EmailAddress_EmailAddress.  Choose a page, any page.  This page will be the one that we target for data corruption.  I have randomly selected a data page with an ID of 18250 (your PagePID may vary).  Now we want to just get a glimpse of the data contained on that page, and to do that we’ll make use of the DBCC PAGE command:

dbcc page('adventureworks2012_corruptnci', 1, 18250, 3)
go

                Now that we know we want to corrupt our specific page (PagePID 18250 in my case), I’ll do a quick calculation to get the page offset in the file.  We know that a page is 8 KB = 8192 B:

select 18250 * 8192
-- page offset: 149504000

                I get a resulting page offset of 149504000.  In order to actually corrupt the containing data file, we need to take the database offline to release the NTFS lock on the file:

use master
go

alter database AdventureWorks2012_CorruptNCI
set offline
with rollback immediate
go

                Now for the fun part:  Corrupting the data.  You can use a hex editor to alter the contents of the data file, and the one I typically use for direct file manipulation is XVI32 Hex Editor (it’s free and exactly what you need for this).  It can be found here.  The following explicit instructions are directions for this particular application, so if you are not using the XVI32 Hex Editor, then you may need to do different steps. 

Open up the AdventureWorks2012_CorruptNCI data file that contains the nonclustered index.  Click on Address and then GoTo and input your page offset (ensure that the decimal format is selected).  In my case, I entered in 149504000.  Click OK and then XVI32 will take you right to the beginning of that particular page.  On the right you will see remnants of the actual data of the table (if you’ve opted to use the EmailAddress table as well, you’ll see AdventureWorks email addresses).  On the left will be the hex representation of that data.  Click anywhere on that data page (I recommend using the right side to navigate to a character), and then zero out (00) the hex value for that byte.  That is enough!  Our data is now corrupted.  Save and close the data file.

Back in SSMS, set the database online:

use master
go

alter database AdventureWorks2012_CorruptNCI
set online
go

                Now I want to just make sure that we definitely corrupted the index:

use AdventureWorks2012_CorruptNCI
go

select EmailAddress
from Person.EmailAddress

                This should give you an error stating that “SQL Server detected a logical consistency-based I/O error: incorrect checksum…….” so on and so forth.


Fixing a Corrupted Nonclustered Index
                So the above was just a really slick way to corrupt a nonclustered index in our test database.  We broke it, and now it’s time to fix it.  But in reality, we initially won’t know exactly what is corrupt.  So you run a routine DBCC CHECKDB, or a user has an error of sorts, and now it’s time to get to the bottom of it.  Running a DBCC CHECKDB will give you the information you’ll need as to what’s corrupt:

dbcc checkdb with no_infomsgs

                The biggest takeaway here is the partition ID of the corrupt table/index.  In my case, my DBCC CHECKDB tells me the issue is with partition number 72057594050445312.  So now I want to find out exactly what table and index that is for (if you did the above process of data corruption, you already know.  But just for explanation’s sake, view the query results):

select
       p.partition_id,
       o.name as table_name,
       i.name as index_name,
       i.type_desc
from sys.partitions p
inner join sys.objects o
on o.object_id = p.object_id
inner join sys.indexes i
on o.object_id = i.object_id
and p.index_id = i.index_id
where partition_id = 72057594050445312

                Bingo!  This tells me that the corrupt partition is indeed a nonclustered index on Person.EmailAddress, and the faulty index is IX_EmailAddress_EmailAddress.

                When a nonclustered index is corrupt, the first step is to try a rebuild (and, it goes without saying but a little investigation as to the cause of the data corruption is warranted and necessary, otherwise for things like a failing drive, it’ll happen again):

alter index IX_EmailAddress_EmailAddress
on Person.EmailAddress
rebuild
go

                If the rebuild isn’t possible, you may need to drop and recreate the index.  The easiest way to do this is through SSMS:  Right-Click on the index and select Script Index as DROP and CREATE to New Query Window.

                And, just for good measure I’ll run my DBCC CHECKDB to ensure that all is well.  And in my case, it is:

-- run DBCC CHECKDB to ensure the database is back to normal
dbcc checkdb with no_infomsgs


Summary
                When we run into corrupt data, our first step is to find out what exactly is that is corrupt.  Far too often we want to run DBCC CHECKDB with REPAIR_ALLOW_DATA_LOSS, but that isn’t always the right answer.  What was explained above is when the victim of data corruption is a nonclustered index.  The first step is to try to rebuild the index if possible.  No harm, no foul.  In the next couple of blog posts I’ll be going over different victims of data corruption and their fixes.  If there are any questions, comments, or issues please feel free to leave a comment or email me at sqlsalt@gmail.com.
Code
                As always, the corresponding code can be found on my SQLSalt GitHub repository:


Comment
                Thanks to Paul Randal for his insightful comment and correction on my post, in regards to rebuild the corrupt index in lieu of jumping to a drop and create first (as well as scripting out the DROP and CREATE through SSMS).  Paul Randal is a leading expert in all things SQL Server.  Thanks, Paul!!  Much appreciated.  Quoted comment from Paul Randal for reference:
“Beware of dropping and recreating the index - if it's enforcing a constraint then the constraint could be violated while the index is dropped, meaning it can't be created again. Better to try rebuilding it first always. I'd also advise using SSMS to script-create the index before dropping it just in case the system tables change in a future release - you don't have to rely on your own code.”